NO SEW Hand-Dyed Ombre Ruffle Tablecloth
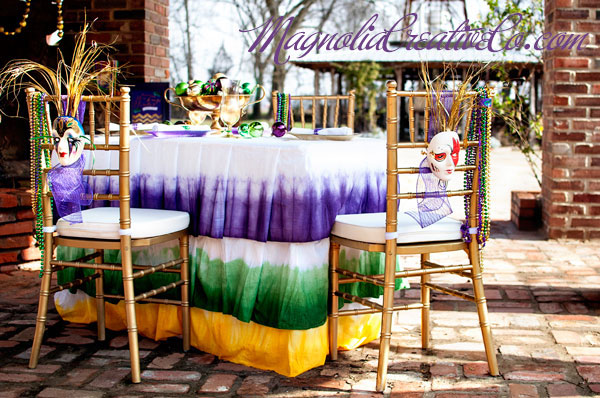
Last year when Emily from Magnolia Creative Co sent me her photos from her Mardi Gras shoot for the first issue of EPM, I was blown away! It was love at first sight, I couldn’t get enough of it, and I was a little sad I don’t live closer to Emily so I could have seen this amazing party in person. The pièce de résistance is, obviously, that gorgeous no sew hand-dyed ombre ruffle tablecloth!
With Emily’s permission, I am re-sharing the step by step by step tutorial. Please take a minute to check out more of Emily’s beautiful work too! You can find her shop here, and her Facebook page here.
I inherited a lot of talents from my mother, unfortunately sewing was not one of them. I’ve tried, I’ve taken a class and it didn’t go well. When the sweet ladies from Everyday Party Magazine asked me to design styled Mardi Gras shoot for the premier issue I was so honored. I wanted to do a classic Mardi Gras party with lots of elegant DIY elements. I recently purchased a lovely ruffled table runner and that was the inspiration for the tablecloth – RUFFLES in Mardi Gras colors. I’m a hippie at hard and have always love hand dyed fabrics too. I researched how to sew it myself and found many well written tutorials but when they started talking about using “rufflers” and pulling strings and such my head started to spin, so I grabbed my trusty glue gun and headed off to Hobby Lobby to gather my supplies.Materials needed:
• White fitted tablecloth – this is the no sew cheat. I purchased mine here
• Lots of white cotton muslin – I purchased 15 yards
• Rit dye in purple, green and gold (yellow)
• Salt
• Surgical Gloves
• Rubber bands (the hair kind are fine)
• Large safety pins
• Coat hangers
• Hot glue gun and lots of glue sticks
• Optional – Purple, green and gold thread and your sewing machineI started by cutting the muslin to cover the top of my table with a little overhang, you need this to glue the top fabric layer to. Next I cut my fabric into three even strips. The height will vary depending on your table. You want to allow for a little overlap to cover the edge of the layer below it. Next I started folding the fabric up and secured the top with the rubber bands.
I got out my cook pot and filled it with water about 6″ deep. Let the water boil with salt in it and “wash” the fabric in the salt water first but only the part you plan to dye. I forgot to salt wash one layer and I bet you can’t tell which one so don’t freak out if you forget. Next add your dye mix and give it a good stir.
This next step takes a while so get comfy! Start by dipping your fabric in your dye color almost to rubber band. You’ll leave it in the dye for 5-10 minutes. Then you’ll redip and leave a few inches from the edge of the top. You’l leave it in the dye for about 10-15 minutes. Then you’ll dip just the edge (about 2 inches) and leave it for about 20 minutes. See why I said get comfy! Luckily I have a cabinet above my stove so I rigged up a tie so that I could hang it from the knob and not have to hold it the entire time, hopefully you can do that too. Repeat these same steps for all three colors to achieve your ombre look.
After you’ve finished dying each piece hang them up somewhere to dry. They will drip so be sure and put something under them to catch the drips because they will stain what’s underneath. Leave them to dry overnight. The next day open up your beautifully dyed pieces and spread them out to admire your work!
Optional sewing step: Using your machine, sew a hem on each edge in an opposite thread color just to add some extra color.
Next comes the fun part, making ruffles! The best way to make sure the layers are even are to do the top (purple) layer first, then the last layer (yellow) so you can center the middle layer (green). Start by attaching the end of your layer the the top middle of your fitted tablecloth. Stretch out some more and attach with another dot of glue. Then fold the layer back, attach with some glue and then pull the fabric forward and keep repeating the same step all the way around the table. The trick is to vary your fold lengths so that the the ruffles are not exact in the same place, especially once all the layers are attached.
I hope you enjoyed this tutorial and have fun making your own dyed tables skirt and experiment with some new color combos. Be sure to share your pictures with me if you do, I’d love to see your creations.
Have fun!
Tags : DIY, Everyday Party Magazine, Magnolia Creative Co, Mardi Gras
In DIY


