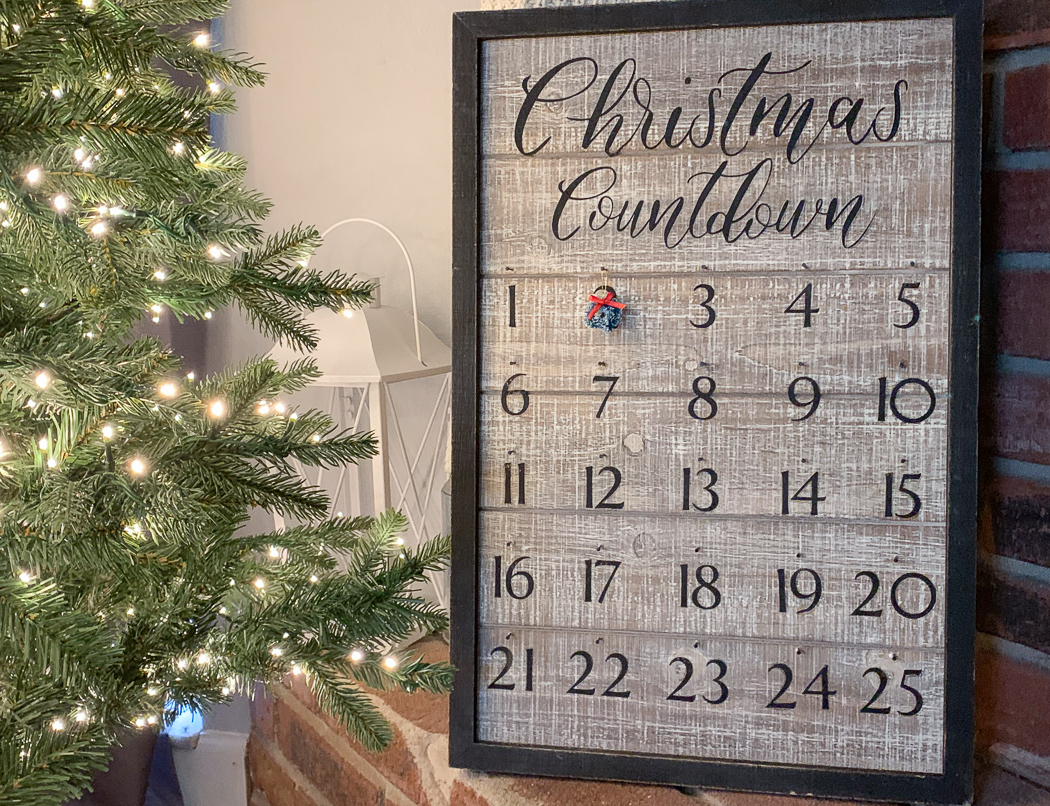
This is our only our third Christmas with teens and tweens that don’t necessarily believe in Santa. And, while they do, wholeheartedly, believe in the magic of Christmas, it’s not quite the same. And, as they have grown, some of our holiday decorations have changed. Some decorations return each year, while others have been placed in special boxes for each of the boys to have when they move to their own homes. This year, I decided to make my own wooden Advent Calendar to match our home and carefully pack away the fabric Advent Calendar we have used for years and years.

I knew last year when I packed up our holiday decorations that it was the last year that we would use our kids’ advent calendar. But, the countdown to Christmas is still an exciting time for our family, and we use each day to celebrate the season, and share the joy. So, I knew we would need to have a new Christmas Countdown Calendar. I thought about buying one, but I really wanted to make it our own style. And, I knew I could create one I loved with a little bit of work and my Cricut Explore Air 2 and EasyPress Mini.
We have already started on some holiday decorating, like this fun sign I made for Holiday Entertaining and these Easy DIY Christmas Ornaments the boys and I made!

I had every intention of actually building my own wood frame for my countdown calendar, but I saw exactly what I was looking for at my local craft store.
Custom Advent Calendar Supplies
If you are like me, you probably have everything you need at home, except the wood sign blank. If not, you can get all the supplies in one trip to the store.

Amazon Links
- Wooden Sign Blank
- Small Nails – I painted mine black with spray paint
- Drill and Small Drill Bit
- Super Glue or Hot Glue Gun
- Small Crafting Wreath
Step 1
Once I got it home, I measured it and created a cut file in Design Space. You can find the file I used here. I sized it to fit on one roll of 12×24″ Iron On.
Step 2


Once you are happy with the sizing and design, send the file to cut. I use Iron On almost exclusively for wood signs. Don’t forget to mirror the cut and place the Iron On on the cutting mat shiny side down.
Step 3

Once the Iron On is cut, weed the excess and cut out each section with scissors. I attached the numbers in groups to make spacing easier. My sign blank was too large to cut out the Iron On as one continuous cut.
Step 4

Measure and lay out each piece of the Iron On on the sign. I used masking tape, a ruler, and a level to help me line everything up.
Step 5

Pre-Heat the EasyPress Mini to the highest heat setting. And carefully press each section on to the wood. This will be tedious, but worth it.
Step 6
Once the Iron On has been applied, measure where you will place the nails. (I spray painted my nails to make them match the sign frame. Just place the nails halfway into a cardboard box and spray paint them) Mark each spot, and pre-drill a small hole in the sign. I actually went through my board, so don’t worry about that if you do the same.
Step 7
Add a dot of super glue to each nail and place in to the pre-drilled holes. Since my nails went all the way through the sign, I added a glob? Dollop? Squirt? of hot glue to the back to keep the nails from poking anyone.
Step 8

Add a tiny craft wreath to the first day and you’re ready to enjoy the season!

If you enjoyed this post, be sure to check out these too!
This is a sponsored conversation written by me on behalf of Cricut. The opinions and text are all mine.
Tags : Advent Calendar, Christmas, Cricut, DIY, DIY Christmas


[…] Wooden Advent Calendar […]